玩法[]
| 玩法 | |
|---|---|
| 裂魂人 | |
| 優點 | 缺點 |
|
|
技能加點[]
| 裂魂人常規加點 | ||||||||||||||||||||||||
|---|---|---|---|---|---|---|---|---|---|---|---|---|---|---|---|---|---|---|---|---|---|---|---|---|
| 1 | 2 | 3 | 4 | 5 | 6 | 7 | 8 | 9 | 10 | 11 | 12 | 13 | 14 | 15 | 16 | |||||||||
天賦[]
小貼士 & 技巧[]
通用[]

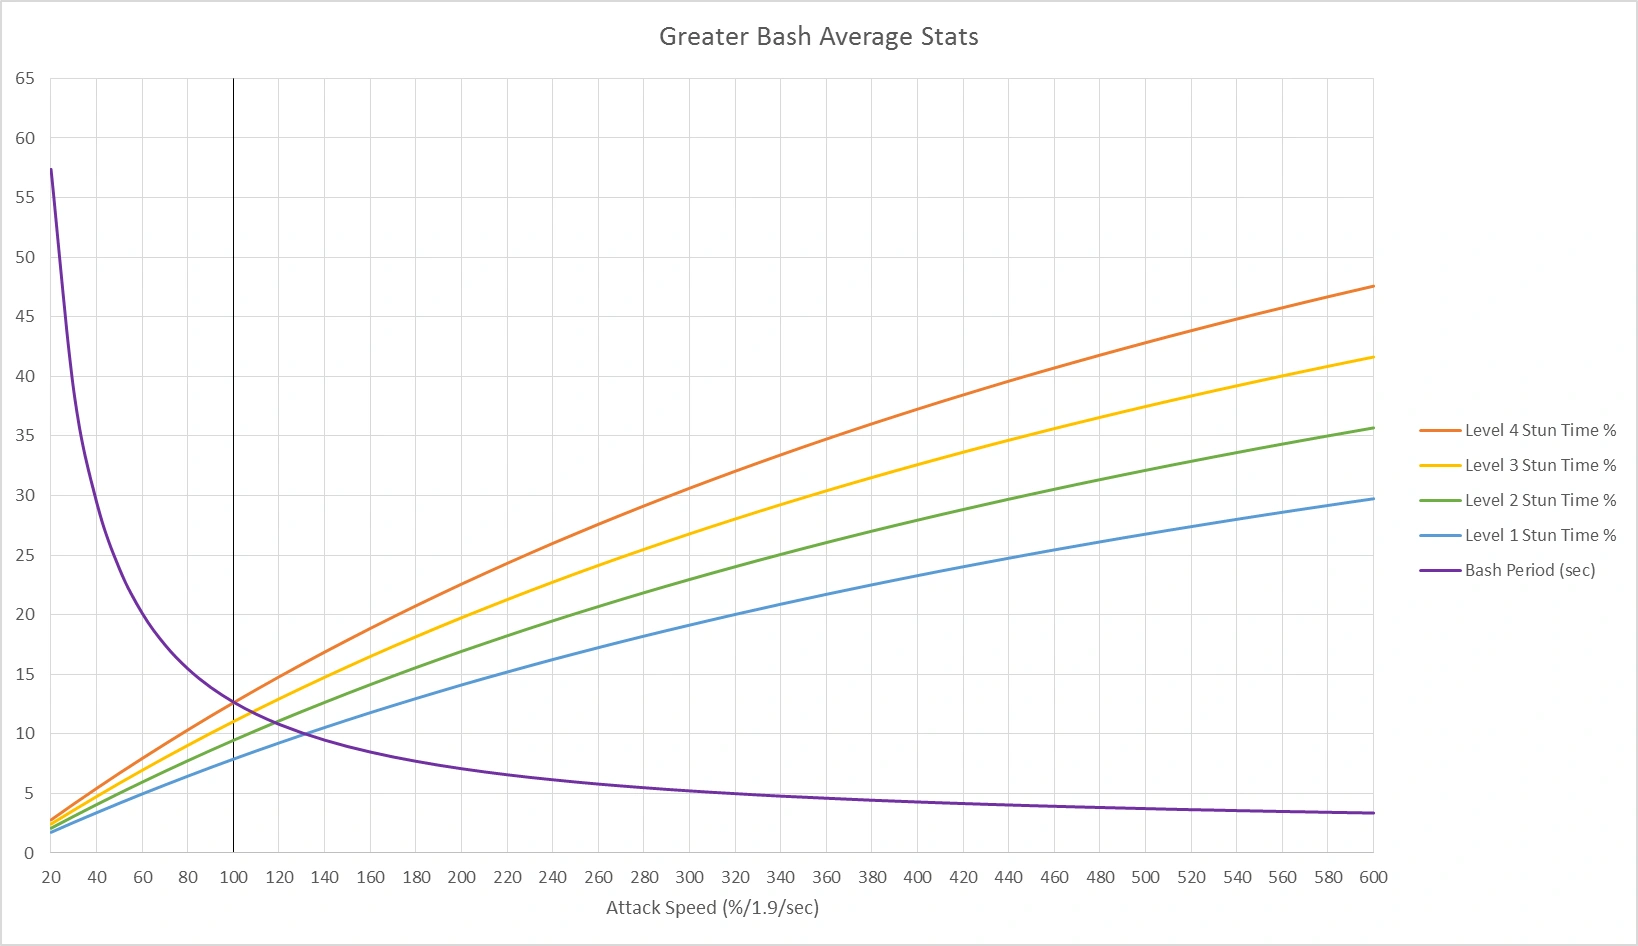
Greater Bash average stats

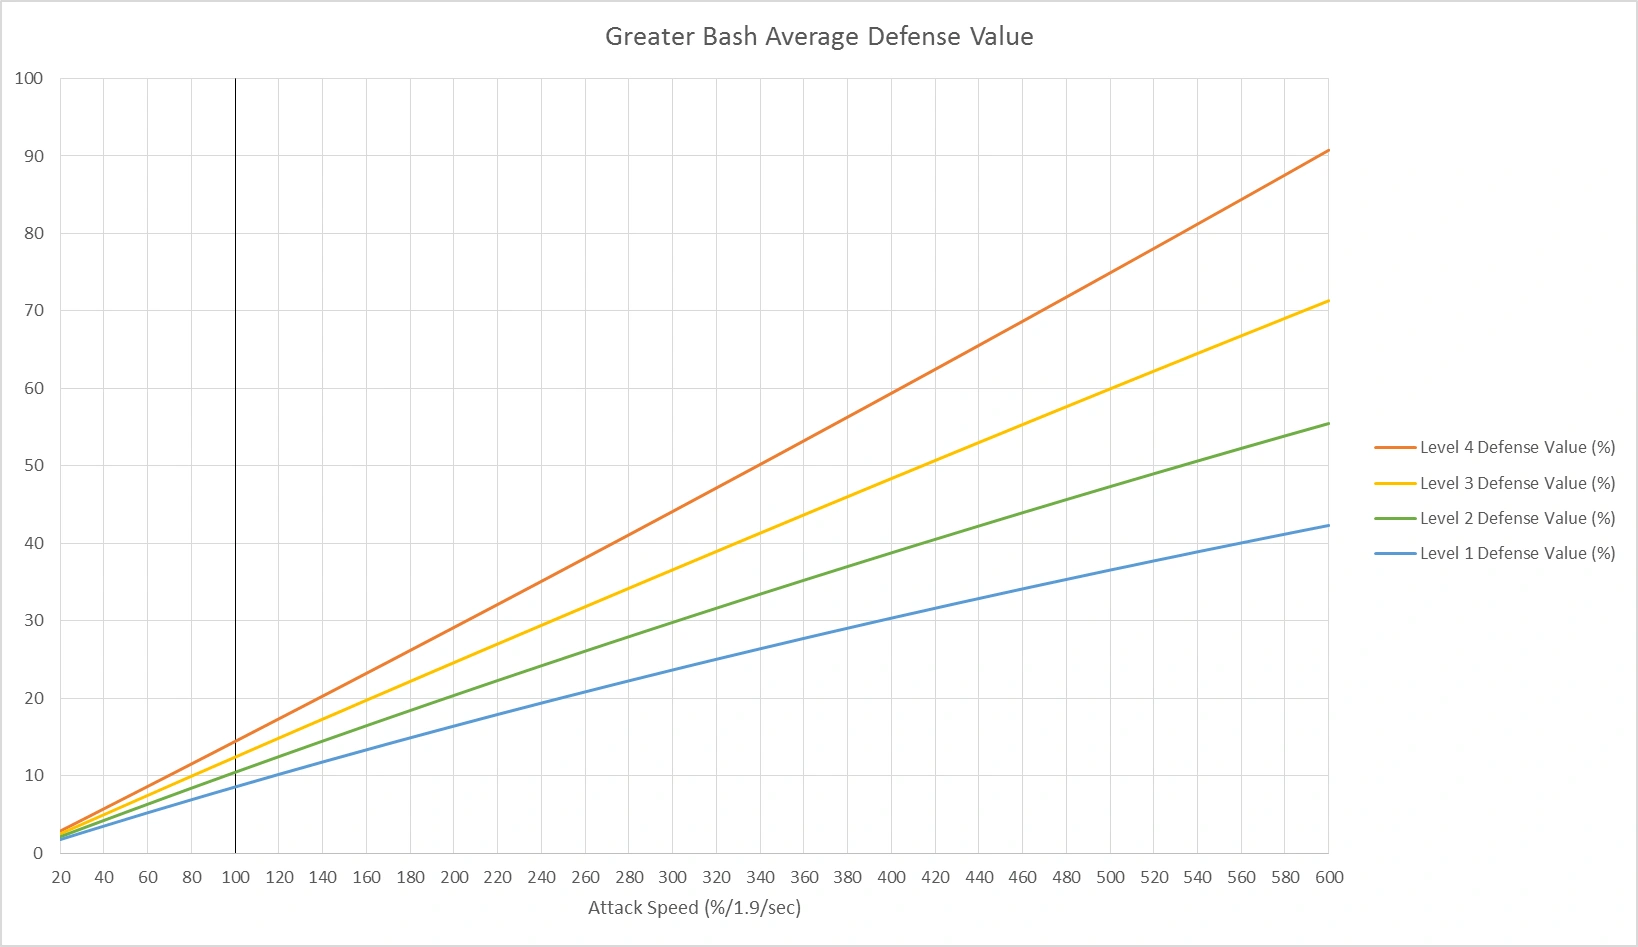
Greater Bash average defense value
- Chaining together Charge of Darkness with Nether Strike can deal high amounts of burst damage in a very short amount of time.
- Spirit Breaker has very little teamfight presence due to his specialized abilities, but he can still be useful at neutralizing targets and forcing enemies back.
- When charging enemy heroes in mid game, be 100% sure that they are alone. A lone enemy may wait out in the open while their ally hides in the trees, waiting for you to charge the bait hero, and finally be ganked. Therefore, 偵查守衛
can greatly reduce uncertainty before charging. - Despite being classified as an initiator Spirit Breaker is more of a hunter who takes out lone targets or chases down fleeing enemy heroes after a team fight. To actually initiate you will either need an 阿哈利姆神杖
so that your ultimate has an AoE presence which in turn weakens your carry potential or use 暗影衝刺 in a way that would let you bowl through all of the enemy team heroes (such as aiming for the furthest enemy hero while the enemy team is standing close to a line formation). - 散夜對劍
is a fair pick on Spirit Breaker, as the bonus move speed improves the damage of his Greater Bash as well as his general speed, improving his chasing ability even further in conjunction with its maim. - Because 林肯法球
triggers on cast, 暗影衝刺 can be used to instantly and globally put an enemy's sphere on cooldown. - With the use of all of your abilities and some lucky bashes, you can keep a single target stunned for 8 seconds. This is a huge stun duration even late game and allows lucky Barathrums to snowball out of control on lone ganks.
- Due to the massive speed boost Spirit Breaker receives while charging (288 more than maximum movement speed), he can catch up to a team fight fairly quickly, even from across the map. While preparing for a team fight you might want to stand at the back of your team and let your allies begin to draw out disables and initiation spells from the enemy, then use 暗影衝刺
on your target, this will disorient the enemy team as you are likely to be hitting a few of them on the way to your target not to mention that they will be left with no disables to stop you.
技能[]
暗影衝刺
- Use Charge of Darkness to get close, stun your target, and make him vulnerable to your attacks.
- 黑皇杖
can be used without interrupting your charge, activate it just when you get close to the enemy to take advantage of its duration during the fight. - 影刃
can also be activated while charging, greatly increasing the surprise factor of his charge and preventing easy charge interruption such as 隔空取物 . In addition, the Shadow Blade bonus damage will be applied to the first attack from invisibility. - Charge of Darkness allows Spirit Breaker to run through units, trees, structures and terrain. It does not indicate your enemies when targeted either, letting you setup ganks.
- Although Charge of Darkness is typically used to get into fights, it can also be used to get back out in a pinch; by targeting a creep in a different lane Spirit Breaker can move quickly to avoid death, then cancel the charge when he is out of danger.
- While it does not provide True Sight the indicator will follow the invisible unit being charged and the Charge will still hit an enemy that has gone invisible after being charged. This will cause the ability to interrupt channeling spells being performed by invisible heroes such as Sand King's Sand Storm.
神行太保
- Empowering Haste active spell increases your move speed, making it handy for reaching the front lines quickly or for quick escapes (for example after charging into enemy territory).
- The move speed increase also synergizes with your passive, potentially increasing your damage output for a short time. Consider using it in order to quickly dispose of lone enemy heroes before they acquire backup.
巨力重擊
- Greater Bash deals more damage depending on Barathrum's movement speed. Getting items that increase movement speed, such as 散夜對劍
and 韌鼓 , will greatly improve your damage.
幽冥一擊
- Nether Strike deals major damage to the target enemy and teleports behind them, wherever they go. You can use this to catch blinking or teleporting enemies before they get away.
- Sometimes it might be a good idea to use 幽冥一擊
on a magic immune hero to interrupt their actions as the greater bash will hit them regardless. Situations where for example your team gets caught in a 黑洞 by a magic immune 謎團 you can turn the tide of the fight if you can stop him right at the beginning.
物品[]
出門:
- 樹之祭祀
s and a 治療藥膏 help Spirit Breaker sustain during the laning phase, preventing him from returning to base due to enemy harassment. - 圓盾
will greatly reduce incoming damage from physical damage during the laning phase. This is most helpful when the lane has one or more ranged heroes harassing consistently. - 鐵樹枝幹
is a cheap and effective way to improve Spirit Breaker's low mana pool, as well as his health pool.
前期:
- 速度之靴
are essential for Spirit Breaker, as the improved speed will allow him to escape deadly situations, as well as catching up to an escaping enemy. The bonus movement speed will also provide additional damage because of 巨力重擊 . - 魔棒
is a useful burst health/mana item if the enemies in lane will be casting many spells. It can later be built into a 魔杖 . - 影之靈龕
is a helpful item when roaming or ganking. Assuming a gank is successful, Spirit Breaker can use the Urn of Shadows to heal without returning to the fountain. The bonus mana regeneration also allows him the ability to use 暗影衝刺 far more frequently.
核心裝備:
- 動力鞋
give additional attack speed, as well as durability and damage, all of which increase the effectiveness of 巨力重擊 . - 魔杖
is good for burst health/mana while providing a boost to his attributes compared to the 魔棒 . - 瘋狂面具
gives bonus attack speed and movement speed when activate, increasing both the damage and frequency of 巨力重擊 attacks. - 黑皇杖
makes you immune to many abilities that interrupt your 暗影衝刺 , allowing you to engage and damage your target unimpeded.
可選裝備:
- 阿哈利姆神杖
improves 幽冥一擊 by greatly reducing its cooldown, as well as increasing its range. It also causes all nearby units to be hit by 巨力重擊 . This can be a good choice if your team needs a powerful initiation spell. - 天堂之戟
will not only increase Spirit Breaker's durability from physical attacks because of the added evasion, its active ability can disarm enemy carries relying on physical damage. - 莫爾迪基安的臂章
grants Spirit Breaker additional attack speed and damage output at the cost of his health every second. However, the life drain can mostly be countered by the lifesteal given by 瘋狂面具 , making it a useful purchase when used correctly. - 強襲胸甲
will give Spirit Breaker a large increase in attack speed, as well as providing an attack speed/armor aura to nearby allies. The extra attack speed will cause 巨力重擊 to occur more frequently. - 金箍棒
will grant a significant damage bonus on when the bash occurs. This synergizes well with the other attack speed items used to increase the frequency of 巨力重擊 . - 韌鼓
increases the movement speed and attack speed of both himself and his team. The bonus movement speed and attack speed synergize well with 巨力重擊 . - 銀月之晶
gives Spirit Breaker the largest single-item-slot increase in attack speed in the entire game, which causes 巨力重擊 to occur very frequently. Thus, it should be considered to keep it through the majority of the game until a more effective item can be purchased, at which point the Shard can be consumed and replaced - The attack speed bonus will be halved, but having a permanent 60 attack speed bonus without needing an inventory slot for it is extremely useful. - 白銀之鋒
grants you invisibility which could be useful for escape or to further increase your ganking/roaming capabilities. Attacking to break invisibility will disable enemy passives, reduce their damage, and give you a powerful 225 strike. It also grants a decent amount of attack speed, attack damage and attribute bonuses. - 微光披風
also gives you invisibility while also making you much more magic resistant during the invisibility, making escapes significantly easier, and can be activated before using 幽冥一擊 to avoid being interrupted without needing a 黑皇杖 . It also gives him attack speed and natural magical resistance, making him a stronger tank. - 清蓮寶珠
gives you good survivability stats and mana regen to allow you to use 暗影衝刺 with little need to ever return to base for more mana. Its active will also make your initiation abilities stronger as spellcasters will need to think twice before attacking to nuke you or shut you down. - 顯影之塵
should be carried against invisible heroes and heroes that tend to build into 影刃 such as Slark or Shadow Fiend. Not carrying dust allows such enemies to easily escape your ganks. However, 暗影衝刺 will outline an enemy even when they are invisible, so allies can still chase and utilise AoE abilities even without detection.