玩法[]
| 玩法 | |
|---|---|
| 孽主 | |
| 优点 | 缺点 |
|
|
技能加点[]
| 常规孽主加点 | ||||||||||||||||||||||||
|---|---|---|---|---|---|---|---|---|---|---|---|---|---|---|---|---|---|---|---|---|---|---|---|---|
| 1 | 2 | 3 | 4 | 5 | 6 | 7 | 8 | 9 | 10 | 11 | 12 | 13 | 14 | 15 | 16 | |||||||||
天赋[]
小贴士 & 技巧[]
通用[]
- Because of the long durations on Firestorm and Pit of Malice, Underlord specializes in area denial, zoning enemies out in teamfights.
- Underlord does not have a lot of mana. Use his abilities strategically.
- Underlord should remain close to his team, and be present at all fights to make good use of Atrophy Aura.
技能[]
火焰风暴

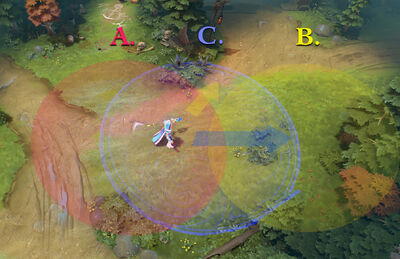
B. Minimal damage. Target sees Firestorm ahead and changes direction.
C. Maximum damage. Target must walk through radius.
- Use Firestorm in combination with Pit of Malice to deal maximum damage.
- This is Underlord's only means of burst damage, and should be used against single targets.
- On the other hand, using Firestorm and Pit of Malice in separate locations creates two zones of denial, which is sometimes more useful in teamfights.
- Use Firestorm to defend towers and high ground, especially around the barracks.
- Use Firestorm to farm and clear creep waves. Stay nearby to gain the bonus damage from Atrophy Aura.
- Use Firestorm after a teammate stuns, roots, or slows an enemy, then follow up with Pit of Malice to keep the target inside Firestorm.
- Without disables, most enemy heroes will not stay inside Firestorm for long. Do not depend on it to deal a lot of damage.
- Try to cast Firestorm a bit ahead of the direction in which the enemy is moving, thus forcing them to walk longer through the area and take more damage.
- However, don't overcast too much, or the enemy will simply see it coming and change directions.
怨念深渊
- Pit of Malice is especially effective against melee carries.
- Due to its long duration, allies can stand around Pit of Malice to use it as a buffer against aggressive attackers.
- Use Pit of Malice on chokepoints to block off enemies.
- Use Pit of Malice on the edge of high ground to act as a trap, causing enemies without vision to walk into a disable.
- Use Pit of Malice to bisect enemy formations and cut off pursuers.
- Use Pit of Malice to funnel enemies into a narrow space, forcing them to group up.
- Use Pit of Malice as a barrier to stop a charging enemy, such as 裂魂人
or 斯拉克 . - Keep in mind that Pit of Malice is only a root. It does not stop enemies from using abilities, items, or attacking targets within their range.
- This means that when retreating, it may be wiser to simply keep running instead of stopping to casting Pit of Malice. Doing so may allow the enemy to get close enough to land a powerful ability, even if they become rooted in the process.
衰退光环
- Atrophy Aura provides Underlord with numerous positioning possibilities, which players should keep in mind at all times.
- During the laning phase, stand close to enemy melee heroes to lower their damage and make it harder for them to land last hits.
- Denied creeps will also boost Underlord's damage.
- Staying near your teammates will not only protect them from nearby attacks, it will also give you bonus damage from any enemies they kill.
- Move towards dying enemies to collect Atrophy Aura's damage bonus.
- Move towards attacking enemies to reduce their damage and potentially save an ally.
- While most supports stay in the backline, Underlord can try and take a more forward position to cover enemies with Atrophy Aura.
- Balance this strategy when faced with dangerous situations, as a dead Underlord is no good to his team.
- Atrophy Aura is most effective against heroes that rely on stats for damage, such as 卓尔游侠
. - Atrophy Aura allows Underlord to farm the jungle better than most supports.
- Clear a camp or wave of creeps to boost Underlord's damage before an upcoming fight.
黑暗之门
- Dark Rift is not a channeled ability, meaning it cannot be interrupted with damage or disables. Underlord can also move after its initial cast animation.
- Use Dark Rift as a fast pushing ability right after winning a teamfight.
- Teleport your team to push in a lane while the enemy is down.
- Teleport your team to Roshan to claim the 不朽之守护
before the enemy respawns.
- Use Dark Rift on a unit or creep wave behind the enemy for a wraparound or pincer attack.
- This is especially effective when the enemy team is sieging your tier three towers.
- Keep summoned units or enchanted creeps in critical locations, such as the Roshan Pit, for instant access through Dark Rift.
- Use 诡计之雾
along with Dark Rift for more effective team ganks. - Remember that using Dark Rift on the entire team is akin to putting all your eggs in one basket. It can be highly rewarding, but also highly risky.
- A well placed Dark Rift can take the enemy by surprise or destroy an important building.
- A poorly placed Dark Rift can bring your team into an ambush, resulting in a teamwipe.
- Make sure that the creep or building you're teleporting to is safe and out of the enemy's reach.
- Dark Rift's target unit will be marked by a very bright effect that is visible to the enemy.
- If the teleport target is killed, Dark Rift is wasted and goes on a long cooldown.
- If the enemy has vision of the teleport target, they can easily initiate on your team.
- Keep track of enemy wards, and deward when possible to avoid teleporting your team into a bad situation.
- Be careful both when casting and exiting Dark Rift, as your closely-packed team presents an easy target for enemy initiators and nukers.
- Since teammates will follow and gather around Underlord for Dark Rift, it is your responsibility to pick a safe location to use it.
- Remember that bringing your team to the enemy base also leaves your own base open to attack. Encourage teammates to carry 回城卷轴
. - Move alongside teammates when retreating to teleport them out to safety.
- Use Dark Rift to counter or intercept an incoming gank.
物品[]
出门装备:
- 树之祭祀
helps Underlord stay in lane. - 净化药水
helps Underlord with his low mana. - 圆盾
is a good item for playing in the offlane, as it synergizes well Atrophy Aura. Later, it can be built into a 先锋盾 or a 赤红甲 . - 铁树枝干
provides a decent boost to Underlord's stats. - 圆环
provides a decent boost to Underlord's stats.
前期装备:
- 风灵之纹
offsets Underlord's slow movement speed and lack of mobility. - 速度之靴
is mandatory on all heroes. - 魔棒
can save Underlord in a bad situation, and can be used to give him enough mana for another ability. - 恢复头巾
keeps Underlord and his ally in lane, and can be built into a 梅肯斯姆 later. - 影之灵龛
provides Underlord with a heal, increased mana regeneration, and more strength.
核心装备:
- 奥术鞋
can be considered to give Underlord some much needed mana. - 魔杖
is a natural evolution from 魔棒 . - 梅肯斯姆
helps keen Underlord's team alive. - 闪烁匕首
is good for initiating with Pit of Malice. - Eul的神圣法杖
helps Underlord with his low mana, and boosts his movement speed to keep enemies within Atrophy Aura's range. The cyclone active helps him set up Pit of Malice.
可选装备:
- 卫士胫甲
is a natural upgrade from 奥术鞋 and 梅肯斯姆 . - 死灵书
30px}} can be used in conjunction with Dark Rift for very fast pushing. At level 3, it will also help Underlord reveals invisible enemies to trap with Pit of Malice. - 刃甲
deters enemies from attacking Underlord. - 赤红甲
along with Atrophy Aura greatly diminishes enemy damage against Underlord and his team. - 希瓦的守护
helps Underlord keep enemies within range of Atrophy Aura. - 强袭胸甲
combined with Atrophy Aura greatly reduces enemy damage output. - 恐鳌之心
gives Underlord great durability, and allows him to hit even harder. - 辉耀
is a highly situational item, and is great for teamfights and pushes. Burning down creeps is a good way to feed Atrophy Aura's bonus damage bonus, and the extra evasion make Underlord even more durable. - 洞察烟斗
reducing incoming magic damage, making Underlord and his team even more durable. - 原力法杖
improves Underlord's mobility, and lets him push enemies into Pit of Malice. - 清莲宝珠
helps deflect magical nuke damage, and is useful on team carries when pushing lanes. - 林肯法球
shields Underlord and his teammates from being disabled.